GroveStreams Raspberry Pi - MQTT Tutorial (Beta)
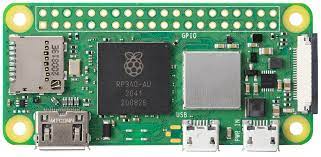
This tutorial demonstrates GroveStreams MQTT with a Raspberry Pi Zero 2W.
The operating system used is Debian GNU/Linux 11 (the one that came on our Pi's mini SD card). The programming language is Java with OpenJDK 11.
 (Optional)
 (Optional)
This tutorial demonstrates:
- Configuring a RaspberryPi Zero 2w to:
- Use WiFi
- Measure distance using a JSN-SR04T sensor (optional)
- Lighting LEDs based on the measured distance (optional)
- Using MQTT5 with GroveStreams for:
- Creating, registering, and using X.509 certificates
- Rolling X.509 certificates and updating the GroveStreams public certificate
- Uploading interval data: free disk space, sys load 1m avg, used heap memory
- Uploading event data: Distance measurements
- Downloading device settings during startup from GroveStreams
- Restarting the RaspberryPi remotely
- Using MQTT ResponseTopics
- Using MQTT to make GroveStreams classic HTTP API calls
- Using MQTT Last Will and Testament (LWT) to set device status in GroveStreams
- MQTT auto-reconnect
- MQTT client caching while communications are down
- Compression
- Log4j and slf4j
- Auto-starting of service on the PI during boot up
- Downloading and reinstalling the gspi service from GroveStreams
- Obtaining the orgUid from GroveStreams during startup
- The orgUid is determined from which organization the certificate is registered with
- This prevents hard-coding the orgUid within device code and makes the same code reusable across devices. Only the X.509 certificates and MQTT client ID need to be unique across devices
The number of streams created by this tutorial falls within the free monthly amounts of GroveStreams. Setting the sample frequency to one minute, as shown by this tutorial, will exceed the free transaction amounts after a few days.
Step 1: Create a Free User Account and Organization

Open a browser and navigate to the GroveStreams registration page and sign up.
After creating a free user account, log into GroveStreams.

You will be prompted to create an organization. Select Yes.
What's an Organization?
An organization is a Workspace, typically representing a home, business, or organization. Each organization has its own set of components, streams, dashboards, maps, and other items. An organization allows you to control user and device access. You are automatically the "owner" and given full access rights when you create an organization. Other users may invite you to their organizations with granted. All of the organizations, that you "own" or are a member of, will appear in your GroveStreams start page (the first page that appears when you sign in).
An organization is a Workspace, typically representing a home, business, or organization. Each organization has its own set of components, streams, dashboards, maps, and other items. An organization allows you to control user and device access. You are automatically the "owner" and given full access rights when you create an organization. Other users may invite you to their organizations with granted. All of the organizations, that you "own" or are a member of, will appear in your GroveStreams start page (the first page that appears when you sign in).
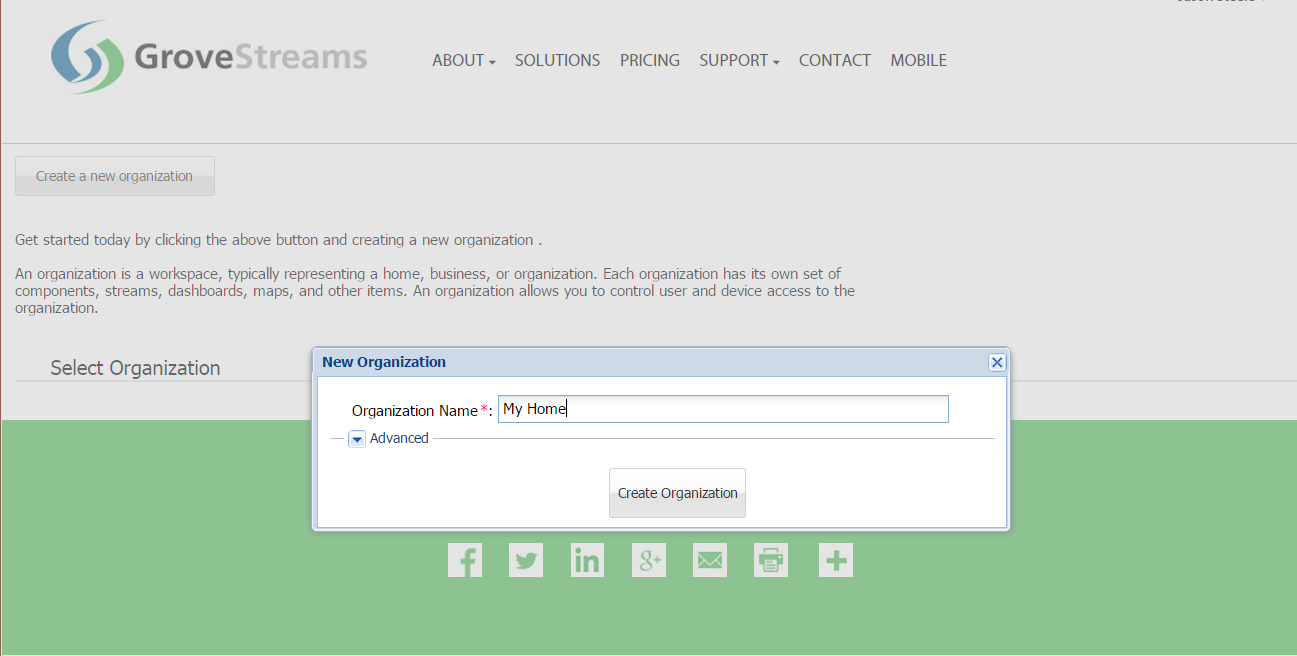
1. Enter a name for your organization and click Create Organization
2. Enter your new organization by clicking on its name
Step 2: Install the Pi's Operating System
This tutorial is using the operating system installation that came loaded on the Pi's mini SD card which is Debian GNU/Linux 11. You can choose a different operating system as long as it supports Java 11. Java 11 was used to develop and test the tutorial.Pre-installation Configuration
Windows Notepad++ was used to change the EOL conversion to unix(LF) while saving in UTF-8 encoding to create these files.
1. Add a blank file called ssh to the root of the SD card so that SSH is enabled automatically during install.
2. Add a file called userconf to the root folder of the SD card to create a new user. File contains:
username:encrypted- password
3. Add a file called wpa_supplicant.conf to the root of the SD card so that WiFi is enabled. Have the file contain your WiFi credentials:
country=US
ctrl_interface=DIR=/var/run/wpa_supplicant GROUP=netdev
update_config=1
network={
ssid="MyWiFiNetwork"
psk="aVeryStrongPassword"
key_mgmt=WPA-PSK
}
ctrl_interface=DIR=/var/run/wpa_supplicant GROUP=netdev
update_config=1
network={
ssid="MyWiFiNetwork"
psk="aVeryStrongPassword"
key_mgmt=WPA-PSK
}
Installation
1. Plug the micro USB end into the Pi Zero, and plug your USB device into the standard female USB input (on a Linux/Untuntu computer for this tutorial). This should start the installation of the Pi's operating system.
2. Ssh into pi@raspberrypi
ssh pi@raspberrypi
If that doesn't work, use your Pi's IP address. To Find your Pi's IP address:
- Login to your home router. My home router login page is found at 10.0.0.1. Yours may be different.
- Look at the "Connected Devices" page.
- Or, if you’re connected via WiFi, ping raspberrypi from a terminal window to see its IP address.
-
ssh@ipaddress
sudo apt-get update
4. Set the timezone:
tzselect
5. Install OpenJdk 11:
sudo apt-get install openjdk-11-jdk
Step 3: Install and Configure the gspi Service on the Pi
1. Install the gspi files from GitHub:- 1. Create the gspi directory and open rights to the folder temporarily:
sudo mkdir /opt/gspi
sudo chown -R gs:gs /opt/gspi - 2. Download the gspi.zip file from GitHub into the Pi's /opt/gspi folder. Click the download button on this page: https://github.com/GroveStreams/api-examples/tree/master/mqtt/gs_pi_java/resources/gspi.zip
- 3. Extract gspi.zip:
cd /opt/gspi
unzip gspi.zip
- 1. Set a unique device name across GS organizations. The name will be used for the MQTT client ID, the GS component ID, and as part of the generated X.509 certificate Distinguished Name (DN). The gspi logic will attempt to find a name in this order:
- a. The DEVICE_NAME property within the /opt/gspi/gspi.properties: Uncomment DEVICE_NAME and set a unique name if you choose this method.
- b. The host name of the device: Edit /etc/hosts and set it to a unique name.
- c. The Pi's cpu serial number
- d. A hard-coded value of gs_piwill be used if a name is not found above.
- 2. Configure variables for X.509 certificates:
- 1. Edit /opt/gspi/gspi.properties:
- a. Set DEVICE_DOMAIN to something unique to your business such as your company domain name or your email address. DEVICE_DOMAIN is used in the generated cert’s CN (common name) which is part of the cert’s DN (distinguished name). Cert DN's must be unique and using the domain name will help assure this.
- b. Set the KEYSTOREPWD and TRUSTSTOREPWD passwords in gspi.properties.
Or the passwords can be hard-code into the Pi’s java class com.grovestreams.gspi.mqtt.PiMqttClien. Hard-coding is more secure than storing it in a properties file, but hard-coding will require recompiling the project and reinstalling the jar file on the Pi. The passwords are needed for certificate generation and by the Pi while running.
- 2. There are many other settings within the gspi.properties file. Some are commented out withe the # character. It is recommended that no other settings are changed until the tutorial is running successfully.
- 1. Edit /opt/gspi/gspi.properties:
- 3. Generate the X.509 certificates:
The gencerts.sh script will generate a CA certificate along with a device certificate that is signed by the CA certificate. Generation of both of these certificates are done on the Pi. This technique is not recommended for production systems. A commercial CA certificate should be used and it should not reside on the device. This technique is used to keep things simple and affordable for the tutorial.
Temporarily adjust rights and Run the gencerts.sh script on the Pi:
sudo chmod -R u=rwxs /opt/gspi/certs
/opt/gspi/certs/gencerts.sh
Watch for any errors while running the script. The /opt/gspi/certs directory should now have three .p12 store files, three .crt public certificate files, and 1 .csr file.
-
4. Secure the gspi Files:
sudo su
groupadd gspi
sudo useradd -s /bin/false -g gspi -d /opt/gspi gspi
chown -R gspi:gspi /opt/gspi
chmod -R g=rxs /opt/gspi
chmod -R u=rwxs /opt/gspi
!!!!!!!!!!!!!! chmod -R g+w /opt/gspi/certs/truststore.p12 NOT SURE ABOUT THIS - DIDN'T DO YET
exit
Step 4: Register the X.509 Certificates with a Policy
This section will create a Policy and associate it with the Pi's imported certificates. The policy and certificates will allow the Pi to communicate with the GroveStream servers with SSL and restrict the certificate to the configured capabilities within the Policy. Extra metadata can be associated with the certificate to assist with component auto-create and pinning.1. Create a Policy
A policy defines the capabilities of a certificate. A policy can be shared by many certificates. Policy topics support wildcards * and #
Open the MQTT certificates window:
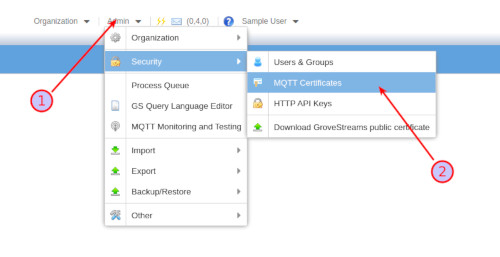
1. Click Admin within you organization
2. Select MQTT Certificates
Create a new Policy:
You can skip the creation of a new policy and jump to the next section, 2. Import Certificates, if you see GSPI Policy already listed under Client Certificate Policies.
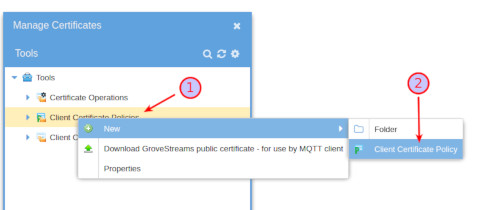
1. Right-click Client Certificate Policies or a subfolder for the new Policy location and ...
2. Select New - Client Certificate Policy
Create the Publish and Subscribe Set:
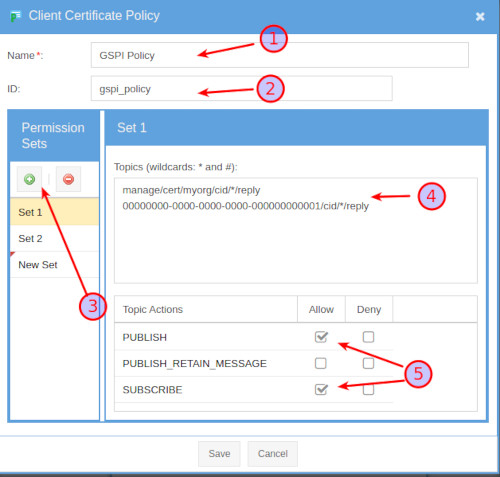
1. Name the Policy
2. Set the Policy ID. IDs are used mainly by the GS API library
3. Click + to create a new set
4. Copy and paste the topics below into the policy Topics field:
manage/cert/myorg/cid/*/reply
{yourOrgUid}/cid/*/reply
{yourOrgUid}/cid/*/reply
5. Enable Publishing and Subscribing for the topics above
Reply topics need both Publish and Subscribe capabilities because the Pi will Subscribe for a reply and the GS MQTT server will Publish the reply. The GS MQTT server will check to ensure the certificate policy allows for the publish of the reply.
Create the Subscribe Set:
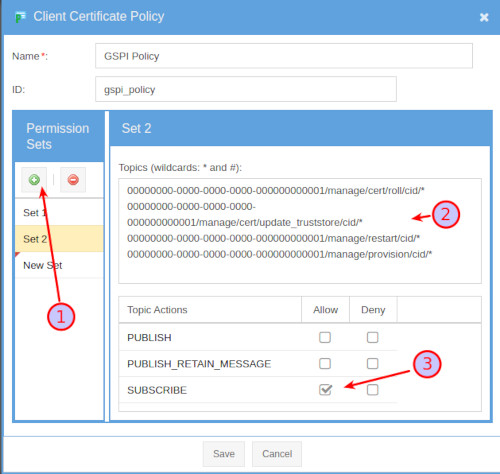
1. Click + to create a new set
2. Copy and paste the topics below into the policy Topics field:
{yourOrgUid}/manage/cert/roll/cid/*
{yourOrgUid}/manage/cert/update_truststore/cid/*
{yourOrgUid}/manage/restart/cid/*
{yourOrgUid}/manage/provision/cid/*
{yourOrgUid}/manage/cert/update_truststore/cid/*
{yourOrgUid}/manage/restart/cid/*
{yourOrgUid}/manage/provision/cid/*
3. Enable Subscribing for the topics above
Create the Publish and Subscribe Set:
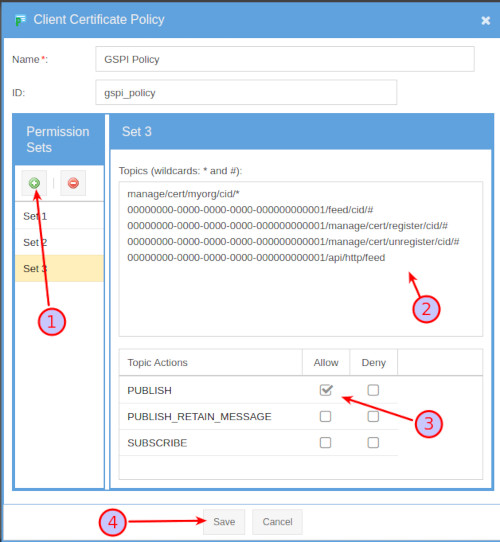
1. Click + to create a new set
2. Copy and paste the topics below into the policy Topics field:
manage/cert/myorg/cid/*
{yourOrgUid}/feed/cid/#
{yourOrgUid}/manage/cert/register/cid/#
{yourOrgUid}/manage/cert/unregister/cid/#
{yourOrgUid}/api/http/feed
{yourOrgUid}/feed/cid/#
{yourOrgUid}/manage/cert/register/cid/#
{yourOrgUid}/manage/cert/unregister/cid/#
{yourOrgUid}/api/http/feed
3. Enable Publishing for the topics above
4. Click Save to save and close the window
2. Import Certificates
This section lists the steps to import X.509 certificates and assigning their policies. The entire certificate chain, including the root, needs to be imported into your GroveStreams organization. A purchased certificate may include a bundle certificate which may be imported. Bundles usually contain the entire chain above the device certificate. Certificate Authority (CA) certificates, including bundles, only need to be imported once into an organization and can belong to many organizations. A device certificate can only belong to one organization. It is highly recommended that each device have its own device certificate.
Ideally, only the device certificate should reside on the Pi and the CA certificate (private key and public key) would be imported from somewhere else. This tutorial is generating and storing both certificates on the Pi.
Open the MQTT certificates window:
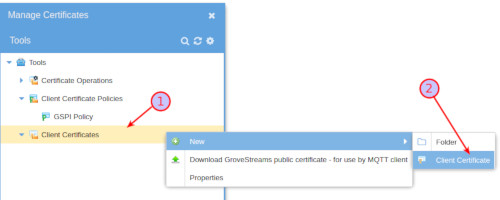
1. Right-click Client Certificates or a subfolder to import the certificates into and ...
2. Select New - Client Certificate
Import certificates:
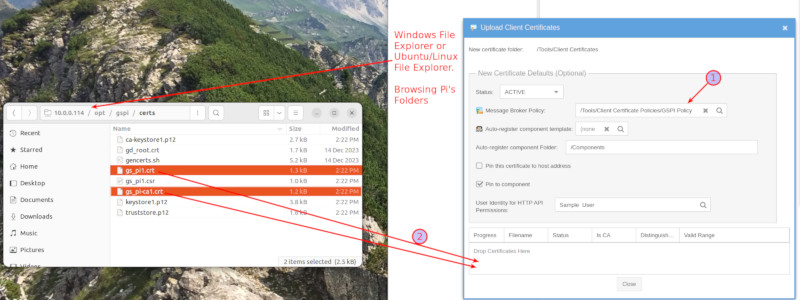
1. Select the Message Broker Policy that was created earlier. All New Certificate Default settings will be assigned to imported certificates.
2. Open a file explorer window for the Pi and navigate to the Pi's /opt/gspi/certs directory and drag device certificate,gs_pi1.crt, and the CA certificate, gs_pi-ca1.crt, onto the import window. The import occurs as files are dropped.
View imported certificates:
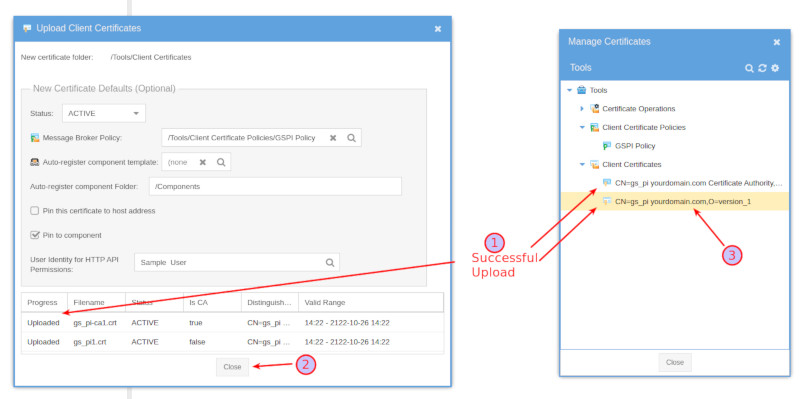
1. Ensure the import progress is Uploaded and the new certificates appear within the Manage Certificates window
2. Close the import window
3. Double-click a certificate to view or edit it
Step 5: Testing and Registering the gspi Service
1. Test starting the service:- Run in console mode: sudo /opt/gspi/gspi.sh console
- Check for exceptions in the console or in the log: /opt/gspi/logs/gspi.log
- The warnings in the console and log are OK. Watch for Exceptions and Errors.
- Watch for errors within GS System Notifications in your organization. Click the envelope icon in the organization Observation Studio's toolbar.
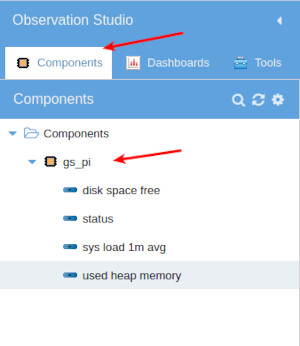
- A new gs_pi component, along with its data streams, will appear within Observation Studio under the Components tab:
Firewall Configuration
Some home and business gateways will prevent MQTT communication from the GS server to your Pi by via port 8883. You may need to configure your gateway to open port 8883. The Pi's log file should indicate a communication error if this is the case. My home router is Xfinity and I didn't have to change anything.
Congratulations! You have successfully used MQTT to communicate with your Pi fromGroveStreams.
2. Stop the service: Ctrl-C or if not in console mode: sudo /opt/gspi/gspi.sh stop
3. Register the service: sudo /opt/gspi/gspi.sh install
The gspi service will now auto-start during OS startups and respond to the System Service Commands below.
Service issues can be detected by running: sudo systemctl status gspi or by interrogating /opt/gspi/logs/gspi.log
Direct Commands:
sudo /opt/gspi/gspi.sh start
sudo /opt/gspi/gspi.sh restart
sudo /opt/gspi/gspi.sh stop
sudo /opt/gspi/gspi.sh install
sudo /opt/gspi/gspi.sh uninstall
sudo /opt/gspi/gspi.sh restart
sudo /opt/gspi/gspi.sh stop
sudo /opt/gspi/gspi.sh install
sudo /opt/gspi/gspi.sh uninstall
System Service Commands:
sudo systemctl start gspi
sudo systemctl stop gspi
sudo systemctl status gspi
sudo systemctl stop gspi
sudo systemctl status gspi
Step 6: Enable the JSN-SR04T Sensor and LEDs (Optional)
1. Edit /opt/gspi/gspi.properties. Sudo or su will be needed as this file has been secured: sudo nano /opt/gspi/gspi.properties2. Change ENABLE_DISTANCE_AND_LED_LOGIC to true
3. Power down pi
4. Setup the Breadboard:
Actual Breadboard setup used for Tutorial:
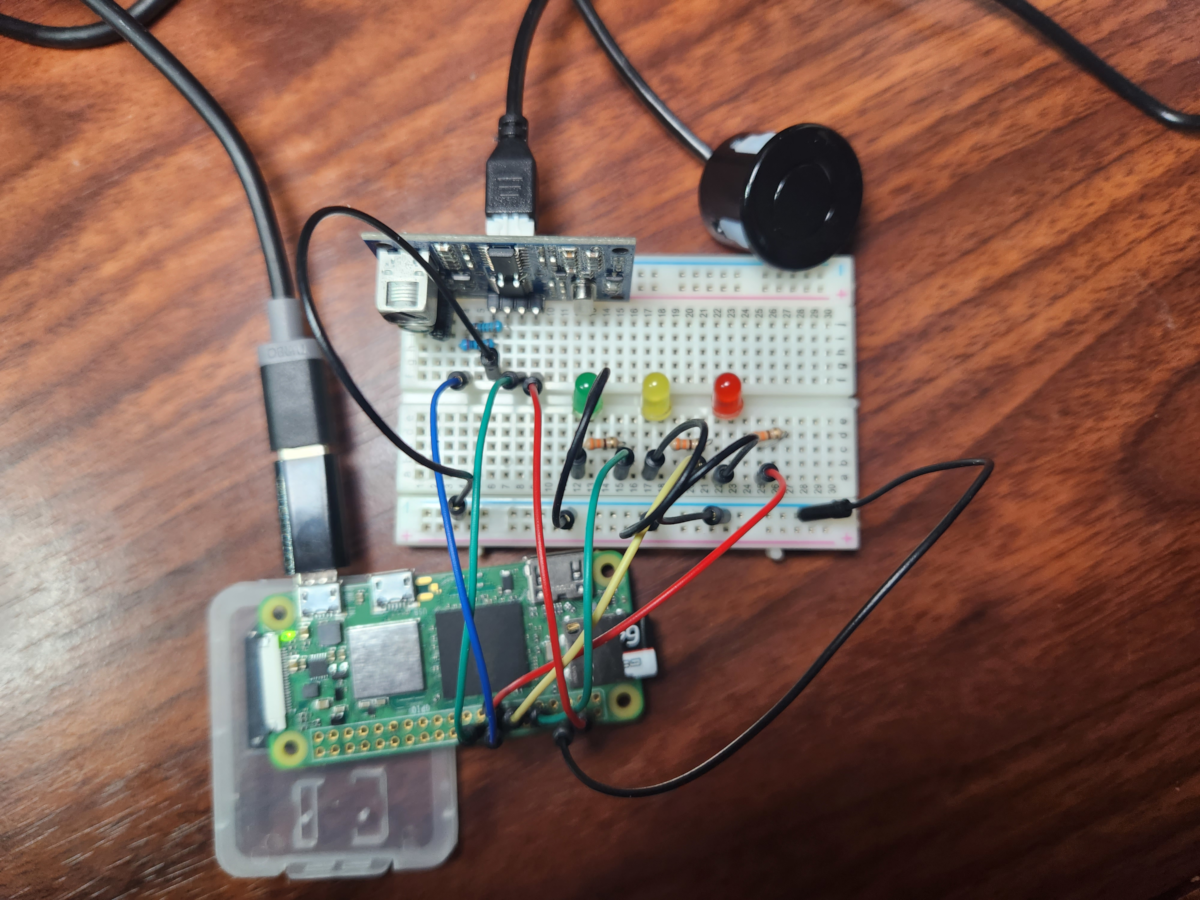
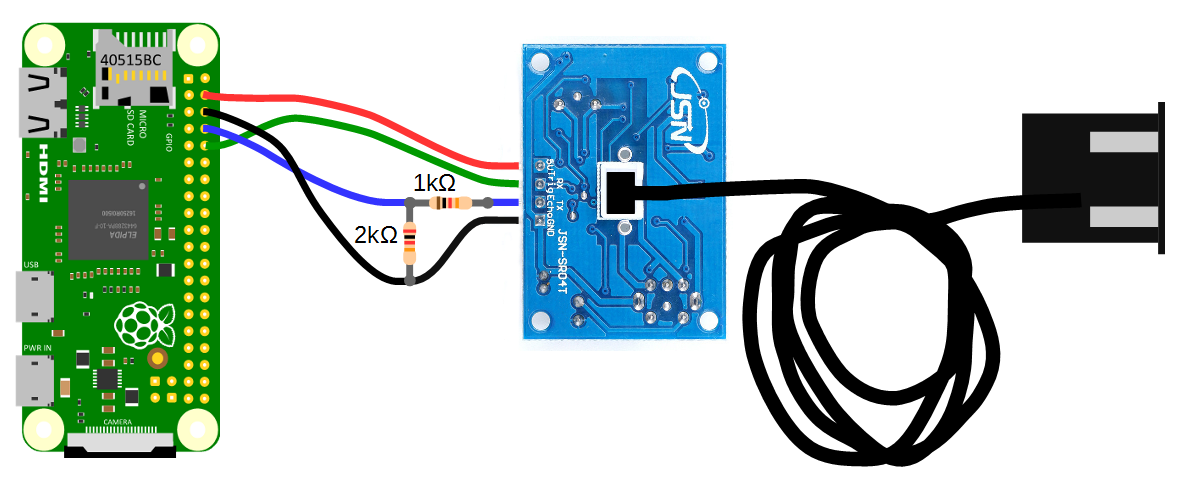
PIN 4 is used for 5v Power
PIN 6 is used for ground
Distance JSN-SR04T Sensor
1 and 2 ohm resistors
GPIO_TRIG= 24; // PIN 18 = GPIO 24
GPIO_ECHO = 23; // PIN 16 = GPIO 23
LEDs
330 ohm resistors between GPIO and LED
GPIO_GREEN = 17; // PIN 11 = GPIO 17
GPIO_YELLOW = 27; // PIN 13 = GPIO 27
GPIO_RED = 22; // PIN 15 = GPIO 22
For more information about Pi LEDs see: Basic GPIO Control on Raspberry Pi Zero W – Blinking an LED
Below is a JSN-SR04T diagram that provides more clarity than the photo above. The tutorial breadboard used different GPIOs than indicated in the below diagram. See GPIO_TRIG and GPIO_ECHO above for the GPIOs used in this tutorial which are required for the gspi code to work successfully:
Pinout for Raspberry Pi Zero 2W:

5. Power-up the Pi
6. Startup gspi service:
- The gspi service will already be running after power-up if sudo /opt/gspi/gspi.sh install was run earlier
- If it is not running, run in console mode: sudo /opt/gspi/gspi.sh console
- Check for exceptions in the console or in the log: /opt/gspi/logs/gspi.log. Warnings are OK.
- Watch for errors within GS System Notifications in your organization. Click the envelope icon in the organization Observation Studio toolbar.
- The operating range of the JSN-SR04T sensor is 25cm to 4.5m. Resolution is 0.5cm. Move the sensor around and watch for the LEDs to change as the distance changes.
- You will see the new distance stream automatically appear under the Component:
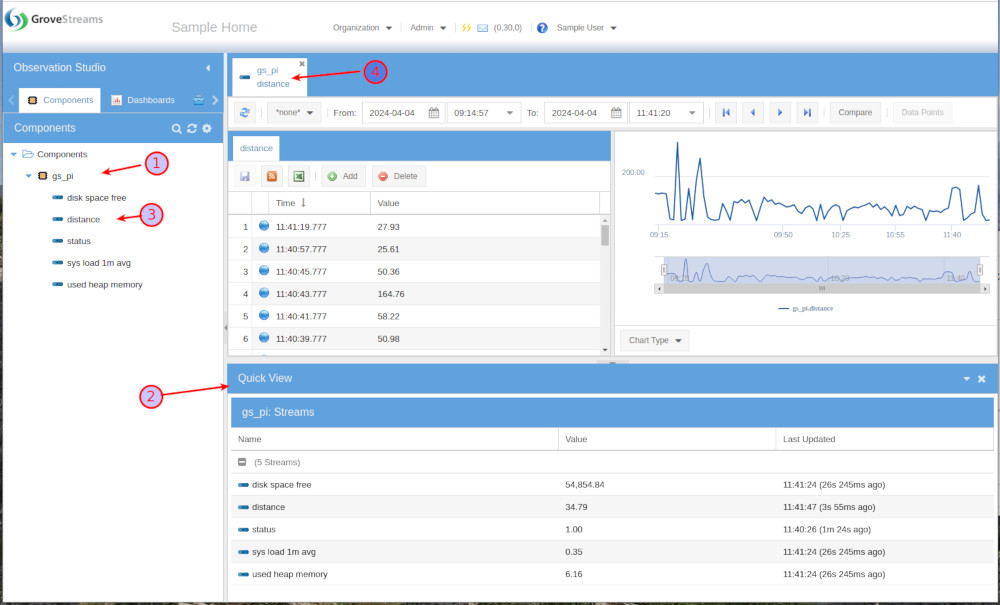
1. Select the component to get a Quick View (2) of it
3. Double click the distance stream to view, graph, or edit its data (4)
Congratulations! You have successfully setup the JSN-SR04T sensor with LEDs.
What's Next?
The Pi tutorial continues with GroveStreams Raspberry Pi - MQTT Tutorial Extras which includes these items:- Viewing, building and debugging the Pi's GroveStreams' code
- Configuring the Pi's settings from GroveStreams
- Creating a GroveStreams component template
- Detecting Expiring X.509 certificates
- Rolling X.509 expired certificates
- Updating the Pi's GroveStreams public certificate remotely
- Certificates in Production
- Downloading and reinstalling the service from GroveStreams
- Configuring an Event Action Package that makes MQTT Publishes
- Restarting the RaspberryPi remotely
- Using Request-Response pattern
- Using MQTT to make GroveStreams classic HTTP API calls
- Using MQTT Last Will and Testament (LWT) to set device status in GroveStreams
- MQTT auto-reconnect
- MQTT client caching while communications are down
- Compression, Logging (Log4j and slf4j)
- Determining data I/O
Troubleshooting
Watch for errors within the Raspberry Pi command window while running gspi in console mode. Check /opt/gspi/logs/gspi.log for any issues.If the call made it to a GroveStreams server, but an error still occurred, a GroveStreams system notification will be created that contains the error. While in the GroveStreams organization's Observation Studio, click on the Notifications button (located in the top toolbar. It looks like an envelope) and select the System tab. Click Refresh to list new notifications.
Ensure your Raspberry Pi can reach the GroveStreams servers. Do a command line ping to the URL defined in the gspi.properties BROKER_URL variable from your Raspberry Pi' terminal window. If that is unsuccessful, then try pinging the GroveStreams IP address directly (173.236.12.163). If you can ping the IP address, but cannot ping the BROKER_URL URL, then you are experiencing a DNS lookup issue.
Still having problems or you want to modify the solution and are not sure what to do?
Send us an email and we'll do our best to help you out: support@grovestreams.comHelpful Links
GroveStreams MQTTGroveStreams Help Center
GroveStreams HTTP Feed API
GroveStreams HTTP Advanced API
GroveStreams Forum
Raspberry Pi Forums
